
Everything is illuminated. It's like Abrams' Star Trek out here.
There's a recurring element in all of my photographic efforts, and that constant is this:
I never, ever take the easy path. The most burdensome processes make for the most appealing, and most rewarding, endeavors. The harder I have to work at something, the greater my dedication to seeing it through. I guess I'm a glutton for punishment.
Take Hot Summer Nights, a project that I've been working on since the beginning of March, 2015. I joined local photographer and Phoenix, Arizona enthusiast Catherine Slye (www.catslye.com) upon her suggestion that we work on a collaborative project together. Catherine had been contemplating the perfect summer photo series, and fully recognized that it's a difficult time of year to shoot in Arizona. Our days bring triple-digit temperatures, and our nights are only slightly relenting. It's almost impossible to do any sort of outdoor photography unless it's after dark - but that worked out in our favor.
As mentioned, Catherine is a proud Arizonan and an enthusiast for local culture and architecture. Her idea was that we would photograph Phoenix scenes, whether well-known or off the beaten path, and present them in a way that most people aren't used to seeing them - in the failing light of the night. We would also partner with Marshall Shore, the Hip Historian, who would provide historical context for our images.
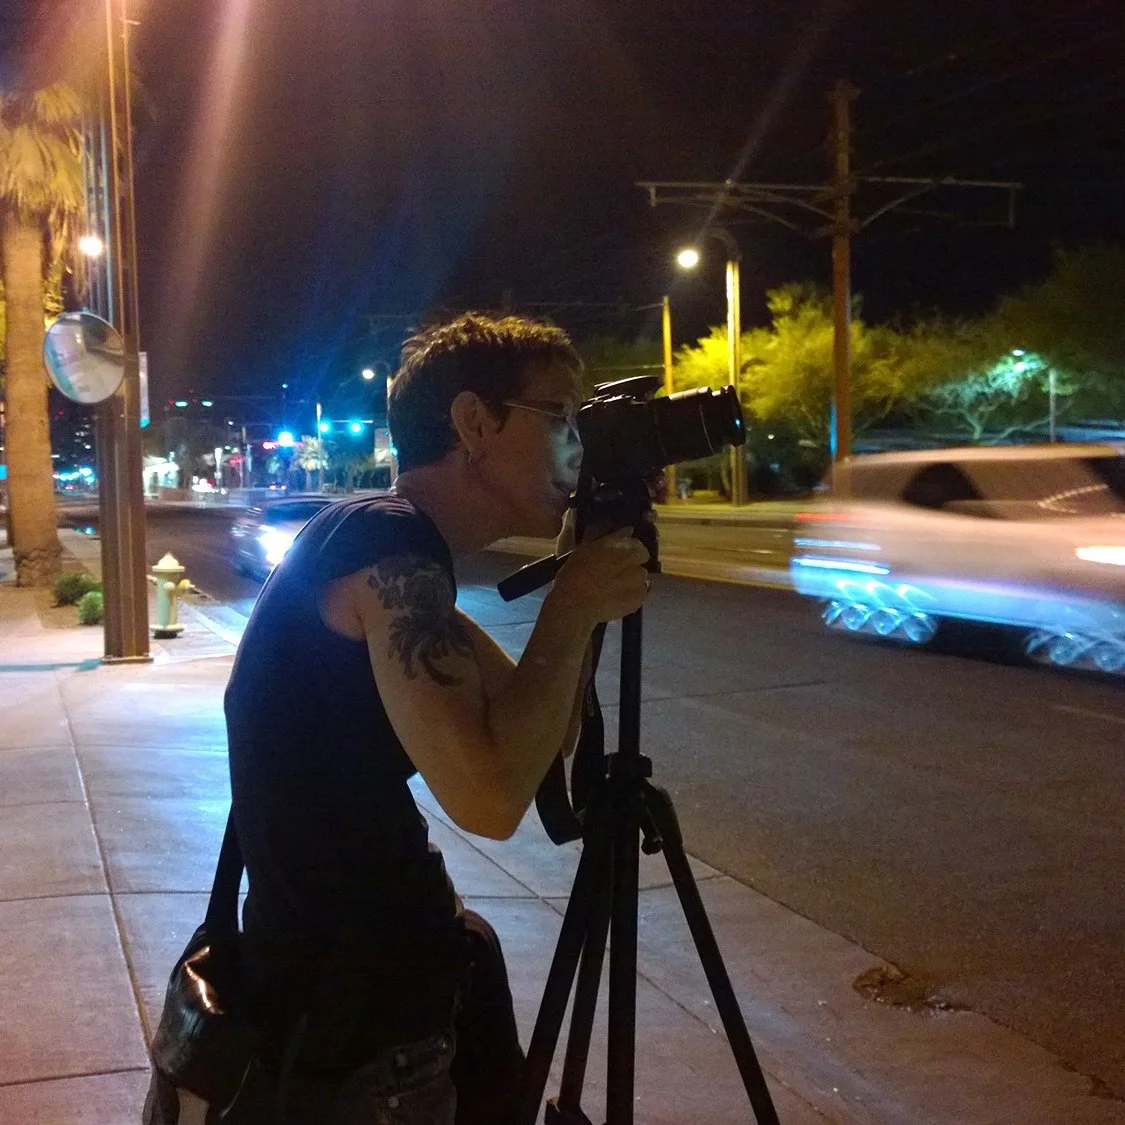
Catherine at work shooting the Burton Barr Central Library
Catherine shoots digitally with a Canon Rebel T3i. When I signed onto the project, I thought I'd keep it simple and use my Fuji GA645Zi, a medium format point-and-shoot camera with a high quality zoom lens. However, I immediately realized that autofocus might be difficult in shooting dimly lit scenes, and I couldn't risk wasted photos. I was certain that I wanted large negatives and deep depth of field, and both my focus and exposure would be critical to my success.
Incidentally, I had just purchased a large-format field camera, the Toyo 45CF. The 45CF is constructed mostly of carbon fiber, meaning that it's incredibly light (less than 4 pounds) and simultaneously very sturdy. The Toyo also shoots sheet film that's 4 inches by 5 inches in a rotating back. By comparison, a 35mm film frame (and full-frame digital camera sensors) are only 24mm x 36mm. If you want to do the math, that's almost a 1500% increase in image area and, ultimately, resolution.

The Toyo 45CF carbon fiber field camera.
I knew that the Toyo was perfect for me because it was going to be such a pain in the ass to haul around. The camera folds up nicely into itself, and with it's carry strap it becomes about the size, shape and weight of a plastic lunchbox. However, the camera can only shoot one sheet of film at a time, and sheets must be loaded into plastic film holders - incidentally, these make up the majority of my camera bag's weight. On an typical night of shooting, I'd carry ten holders, affording myself twenty shots. There were occasions in which I expected to shoot more, and on those days I carried an extra box of film, and a dark bag - used for changing out the exposed film for fresh while in the field. I also needed a portable flashlight, a reflected light meter, and a magnifier for critical focusing on the camera's viewing glass. All of that equipment made for one HEAVY backpack - almost 25 lbs worth of gear - and that's before you take into account my tripod.

What's in my bag? These are the essentials for a night of shooting large format
I definitely got my exercise this summer, as some of our evening expeditions lasted hours and covered miles of city streets. At every location, I'd have to stop, unload my equipment and prepare the scene, which could take up to ten minutes. As mentioned, framing and focusing happens through the camera's viewing screen, a ground glass on which the lens focuses, and where the film will eventually be placed. Unlike SLRs and DSLRS, large format cameras rarely have prism mirrors on the inside of the camera. Thus, the image projected onto the screen is both upside-down and backwards, which makes composition a little tricky.
The constraints of optical engineering made my task even more difficult. I'll spare you the nerdy details of lens design and give you a brief summary instead. Lenses that have wide apertures let in more light, but such lenses are heavy and large. Larger films and sensors naturally require bigger lenses, so "fast" 4x5 lenses are uncommon, and expensive. Unfortunately, this means that the viewing screen was darker than what you'd be able to see with an SLR or DSLR. While maximum apertures of f/1.8 or f/2.8 are common for digital cameras, my first 4x5 lens was an f/6.3, which is about 75% less light coming through! It's like trying to take a photo in a dark alley while wearing sunglasses.

The Tachihara field 4x5 camera and Schneider Xenotar 135mm f/3.5
Eventually, I upgraded my equipment and purchased a Tachihara field camera and equipped it with a slightly wider, significantly brighter 135mm f/3.5, which improved my results greatly. The Tachihara was, admittedly, a purchase rooted in vanity - hand-made in Japan using 300-year old cherry wood and gold tone fittings, it was far more beautiful than the black lunchbox I started off with.
One major advantage to shooting film is the variety of films available, which allow you to render your scene in different ways. Each film stock has a different sensitivity to light, a different color balance, and the unique physical and chemical construction give each film type a characteristic "grain". I wanted to shoot my night scenes in vibrant color, and I wanted to reduce the amount of grain (noise) in the image as much as possible. The best choice for these conditions was transparency film. On smaller formats, this would be called slide film. Slide film has two major drawbacks - First, its ISO rating, or light sensitivity, is usually quite low. Second, slide film doesn't have great exposure latitude. If a scene has high contrast, you'll have to make a choice between a loss of shadow detail or blown out highlights. The advantages of transparency outweigh its shortcomings, in my opinion, so I began considering my options.

A long exposure of a pedestrian bridge at Arizona State University in Tempe.
I had recently seen mention of an interesting film in one of the large-format photography forums that I frequent - a duplicating film with a low ISO rating and a relatively low contrast yield, which seemed perfect for shooting neon and shadows in the same frame. Fujifilm CDU II is meant to be rated between ISO 3 and ISO 12 - I settled at ISO 8, which is incredibly slow (common film speeds are 100 and 400). My exposures were therefore typically between 8 and 30 minutes. Most moving objects did not register in my scenes (people often walked through my photographs), but cars were recorded because of the intensity of headlights and taillights. CDU II is tungsten-based film, meaning that it is meant to be shot under specific temperatures (qualities) of light. My scenes varied greatly, and some will show a strong blue tint due to the variation in light on the streets.
Digital photography has an invaluable advantage in the ability to review photographs immediately upon capture. This gives artists the ability to react to failed exposures and make appropriate adjustments. Film shooters need to have their images developed, and if not done by-hand there could be significant delays between exposure and review. Professional film shooters often used Polaroid films to preview a scene and setting before shooting the real thing.
I took all of my film to my favorite local lab, Tempe Camera. Unfortunately, as film is declining in popularity, developing services are slowing down as well. At Tempe Camera, slide film is only processed on Tuesdays and Thursdays. Most of my outings took place on Friday and Saturday nights, so there was certainly no way for me to know in a reasonable time-frame whether my shots were well-composed, properly exposed or even in-focus! It was therefore critical that I get it right the first time, or be forced to revisit a location.

Thankfully, throughout 100 exposures I had very few critical mistakes. Patience and perseverance made for great results. With all my film developed, Hot Summer Nights was ready to move to the next phase - preparation for printing. Almost all printing for color is done digitally, so I'd need to get my transparencies scanned. I was able to produce proof scans using vintage equipment - another hassle in itself. However, museum-quality prints necessitate quality scanning. I contracted local photographer Josh Loeser to run my film again at high resolution - he returned significantly larger (and tremendously improved) digital images.
Despite all the work that goes into creating my photographs, I'm somewhat of a purist in that I don't believe in heavy editing. My contributions to the project were shot on film, and I embrace every flaw and imperfection that comes with the process. Still, I did spend some time in Photoshop and Lightroom ensuring that what was recorded by the scanner matched what my transparencies look like to me. This involved minor color-correction and adjustment to the black and white levels.
Printing is a significant part of the part of the exhibition preparations. Why spend countless hours capturing photos if not to present them in the best possible way? We decided to print through Phoenix Photo Lab, a friendly team who helped us determine the best sizes and papers for our images. They also helped Catherine and I make necessary adjustments to ensure that our files had color profiles to match the printing equipment being used.

Catherine makes notations for our local printer, Phoenix Photo Lab, to correct her shots.
I've never done any printing before, and there was quite a bit more to be done after shooting than I had expected. This is all, of course, a very long-winded way to say that Catherine and I worked damned hard on this project. We're fiercely proud of the effort that we put into this series, and we hope that when you see our images you can appreciate the love and labor that went into the images. I'm certainly looking forward to sharing the full series with you all after our Hot Summer Night Exhibition.
Our photos will be on display at Chartreuse Art Gallery on Grand Avenue in Phoenix. The show will be up for the entire month of September, and special receptions will be held on both 1st and 3rd Fridays. Additionally, we've also been invited to show our photos in the annual Grid Show at the Trunk Space, an exhibition that focuses on public art, local architecture and vintage signage. The Grid Show will be up through October.
I hope to see you all at our opening night on September 4th! More importantly, I hope that you like this series - it's a far, far step outside of my comfort zone and a far cry from my normal shooting style. Still, I found the entire experience to be satisfying, and I'm pleased that Hot Summer Nights will be my first formal photo show. However, it's not real until the photos are on the wall at the end of this month. Keep your fingers crossed that no further headaches come up - although, to be honest, I might embrace them.
-Jared

Safety first! always use a tripod when you're on the narrow median of a busy underpass.